
I'm Matt Behning
Here's the how to rebuild a motorcycle transmission... you might also find my article on how to install a shift kit on your motorcycle a good time upgrade now.
The Haynes/Clymer manual is an invaluable resource you should get before attempting to do any work on your bike because it has all the factory specs and measurements in case you want to micrometer every single part...
This tutorial is just picking up the flaws of the manuals. That is, they have a huge lack of step by step organization and clear direction.
Most motorcycle transmissions, especially inline four sport bikes, have sequential transmissions like this CBR 954 engine. Kawasaki 14r, 12r, 10r, 9r, 6r, 636, 250; Yamaha R1 and R6; hayabusa; ninja sv650 f4i fz6 fz1; Suzuki GSXR 1300, 1000, 750, and 600; and Honda CBR 1000rr, 954rr, 929rr, 900rr, 600rr even the interceptor VFRs, Rc51... you get the point

Here's a list you can print out, check off as you go:
Some supplies needed:______ziplock bags (20 or so small, 3 or so big)
______Sharpie permanent marker
______Card board box to collect bolts on... in a pattern by punching them through the top
______Zip ties
______Basic tools like 8,10,12,14, and 17mm wrenches and sockets, metric allen wrenches, screw drivers, etc
______Micrometer ($10 ebay version works)
______Torque wrench that can measure NM
______30mm socket (for oil cooler and clutch center nut)
______Snap ring removal tool
______Clutch center holder (you can make your own like I did, or buy one)
______Air impact wrench (helps greatly to remove clutch center nut)
______RTV gasket maker (high temp or regular black works)
______Molybdenum Disulfide grease
______Medium strength thread lock
______Parts or Brake cleaner in aerosol cans
______90% or so Alcohol
______The 10 new Crank shaft stretch bolts (several different sizes buy the kit on discounthondaparts.com)
______New oil filter
______New oil
Not required but worth the small extra cost:______new Clutch springs ($10)
______new clutch fiber disks ($50)
______Factor Pro shift kit ($75 for dedent arm and spring) ($170 for dedent arm, spring, and shift star)
Basic checklist in a good order to get an engine out of a bike (this is a CBR 929/954):______Remove the seats
______Remove the side fairings
______Remove the battery
______Drain the oil,
______Drain the coolant
______Siphon all the gas you can out of the tank
______Remove the fuel tank
______Remove the Air box
______Remove the throttle bodies (plug the holes with rags)
______Remove the radiator and it's hoses and reservoir
______Remove the exhaust (don't be afraid to heat it up the studs and use an air impact wrench... best way to avoid breaking studs off in the head)
______Remove the ignition system (leave Spark plugs in)
______Disconnect all the wire harnesses to the engine (starter wires, stator wires, kick stand switch, neutral indicator, speed sensor, etc, etc) they all only plug into the plug they came from so no need to worry about keeping track... just don't forget any.
______Unplug the Regulator Rectifier... follow wire up off left engine cover.
______Disconnect the control cables to the engine like the clutch cable.
______Mark a dot on the gear change shaft coming out the engine at the gap where the pinch bolt spans... then remove the shifter.
______Remove the Left rear set
______Hold the rear brake (bike in neutral)... sitting on the bike works... and remove the front sprocket.
______Remove rear master cylinder and switch (tie it to the swing arm)
______Remove the kickstand after supporting what's left of the bike... ignore the manual's suggestion to wonkily support the rear of the bike by the passenger pegs...
*zip tie front brake lever squeezed to right grip to lock the front tire
*Jack the rear of the bike up so the tire is off the ground a few inches (2 jacks lifting each side of a 2x6 through the rear wheel... use common sense to jack both evenly up... it's more stable than you think if you have good hydraulic floor jacks)
*Put blocks of scrap wood screwed together supporting the engine (and eventually the rear of the bike) Using the underside of the stator and under the clutch cover are good points to do this from... make sure the engine support is a solid piece screwed securely.
______Remove the intact swing arm with wheel, linkages, and rear brake assembly as one by removing the bottom of the shock from the triangle linkage plates, the pivot bolt for the linkage plates to the frame bracket, and the big pivot bolt... it does take a big 24mm allan key to turn the bolt... I made mine. (only CBR 929 and 954 have the swing arm attached to engine... so most bikes don't require this step)
______ Clean the engine now while it's still sealed up tight fairly well, use brake cleaner, a few different sized wire brushes and common sense.
______At this point you are ready to start unbolting the engine from the frame Assuming you didn't miss disconnecting anything.
______Loosen all 5 of the bolts hanging the engine from the frame Two on top and middle left and right side and one long one for the rear of the engine. (if your wooden stand can't cradle the engine well enough as the frame is unbolted then remove it and put a bunch of blankets on the ground under it.)
______Have a guy hold the sub frame and frame up while someone removes the bolts holding the engine in... once free, lift the frame and sub frame assembly high enough so the rest of the bike can be safely moved off the engine that is now laying the blankets leaking a little oil and coolant etc.
Splitting the cases:-Again, get a manual for the exact details on any given step for detailed instructions on torque and wear specs... this is just a nice point by point list for you to print out... that just happens to have a ton of color pics.
______(with the engine out the pulse generator (red plug) should be unplugged and the clutch cable bracket should be removed)
______Remove and bag the clutch cover bolts (they are all the same on the CBR)
______Turn the Clutch release lever on the cover until it releases and allows the cover to come off
______Remove Clutch cover (keep lever with it) and bag it in a separate bag from the dirty cover bolts
______Remove the five clutch bolts, and the keep the springs with them.
______Springs standard height: 48.8mm, get new ones if 47.4mm or less or if springs are warped
______After checking the clutch spring specs remove the pressure plate and all the hardware with it (bag it all together)
______Remove the clutch disks
______Fiber disk standard thickness: 2.9+mm, get new ones if 2.6mm (.1 in) or less
______Plain plate standard thickness: .3mm+ (.012in), get new ones if less or if warped
______bag them together in order the right order in a ziplock with them submerged in motor oil.
______Remove the clutch center nut after un-staking it.
______Keep track of all the washers
______Pull the clutch housing off the shaft... bag it (with the washers)
______Remove the oil pump sprocket nut by using a flat head through one of the holes to lock it while unbolting the nut.
______Slide both sprockets out with the chain and bag.
______Remove the plate holding the input shaft bearing and cases together (3 10mm bolts) and bag them
______Unbolt the lower cam chain guide bolt (so the cases can separate later)... return bolt to the hole so it doesn't get lost.
______ Leave the shift mechanism and drum in for now
______Remove Stator cover (You can bag all the bolts together because they are the same)
______You can remove the sprocket (and it's shaft) connecting the starter to the fly wheel (bag them)
______Remove the swing arm mount if you haven't already
______Remove the two hoses on the water pump (don't have to remove them off engine)
______Remove the 8 bolts holding the engine cases together from the top of the engine (put them into a card board box in their orientation, don't forget their washers)
______ Flip the engine over
______ Remove the oil filter and oil cooler(30mm socket) (stay organized by leaving the hoses attached)
______ Remove the oil pan (all the bolts are the same so it's up to you if you want to bag them or put them in a card board template)
______Lift off the oil pick up and oil diffuser (bag them together)
______Remove the water pump (set it aside, it'll be attached to oil cooler with hoses)
______Remove all the bolts holding the cases together, including the 10 stretch bolts... put them into a card board box to keep them organized as to where they went... even the stretch bolts that you're not going to re-use... but so you know where the new ones go)
______Separate the cases and set the lower case half off to the side
______Locate the 3 alignment dowel pins (it's up to you if you want to bag them or leave them in place)
______Locate the two steel swing arm pivot collars that are laying loose (bag them or leave them, it's up to you)
______If you haven't already, it's a good time to take some pictures of the transmission and cases for reference later to look at upon assembly
______Inspect the crank journals, seals, oil passage channels, shift forks, shift drum, etc.
______Clean off the old gasket from the engine and case covers
______Remove shift mechanism from lower engine case (that is now separated from engine)
______Remove shift drum if you need to replace it (two 10mm bolts and it pulls out)
______Remove shift arm and spring (bag them together with all the bolts)
______Remove shift forks by lifting shift shaft out if you need to replace your shift forks
______Inspect all the parts
______Lift the drive shafts out (input and out put shafts)
______Remove gasket off output shaft and the half ring washer
______Remove end cap off output shaft
______6th gear, the roller bearings inside it, and the washers on either side of it pull right off
______5th gear can pull right off the output shaft too
______Remove the first snap ring with your snap ring removal tool
______Lay each gear, washer, bearing, snap ring, etc, out in order as it comes off the shaft face up (see pics)
______4rth gear, the grooved washer, and the collar it rests on pulls off
______Remove the toothed washer and the washer it locks into (note how they are placed before you remove them)
______3rd gear can now be removed along with the collar it rests on and the washer after it
______Remove the second snap ring
______2nd gear can now come off the output shaft
______Remove the third snap ring
______Remove the grooved washer, 1st gear, and the collar it rest on off the output shaft.
______You can disassemble the input shaft in the same way (if needed)
______You can now closely inspect the gears, replace the ones needed, or salvage them in the way that is described in the how to here.
Reassembly:______With all the gears laid out in order, you can orient and swap out what gears you've bought or salvaged...spray the gears you worked on with parts cleaner to remove the shavings or dirt etc.
______Reassemble the gears, washers, snap rings, etc back onto their shaft in the same way that they were removed. If you kept good order of everything it's no problem.
______Compare your final rebuilded transmission to the picture you took before you removed the shafts out of the case
______Place the shafts back into the case half, make sure the hole in the caps fit into the pins in the case.
______Put the Molybedium disulfide grease on the crank journals and bearings.
______If you haven't already, put the shift drum, forks, and dedent arm with spring in.
______The shift forks go in like so with the "R" fork nearest the clutch/ right side of the engine, "C" is in the center, and "L" is on the stator/left side of the engine.
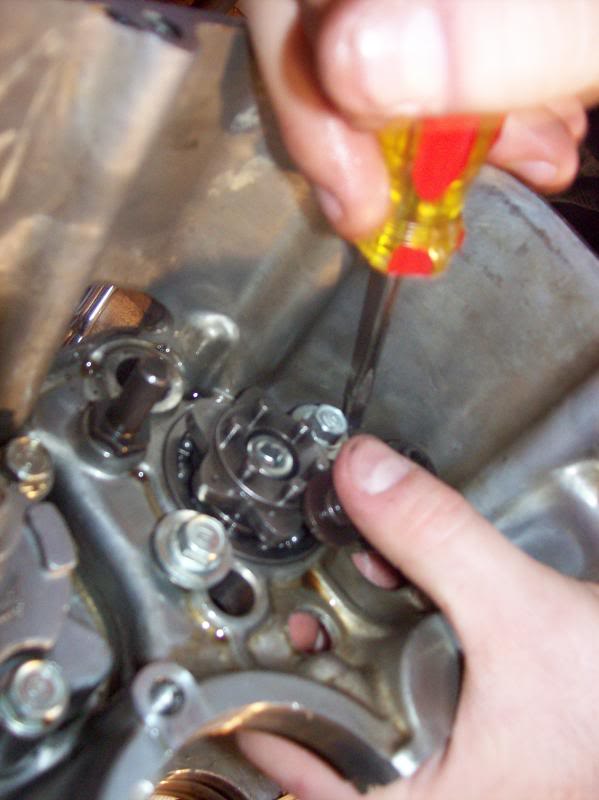
______If you took the shift star off the shift drum you can put it back on... 15Nm of torque
______The drum/shift fork shaft retainer bolts also need medium strength thread lock (as do all the bolts you're re-installing) and can be torqued down to 12 Nm...
______The shift arm can be torqued down to 12Nm
______The shift mechanism slides right in and positions over the shift star to select gears.
______You can put the lower case half on dry, put a bolt in each corner and try shifting through the gears to make sure you installed everything right.
______As you lower the case half down you have to align the shift forks into the transmission. the shift fork pins only fit into the drum one way... as for the shift forks: the R and L fit back into the output shaft and the Center fork fits forward into the input shaft.
______With the cases temporarily dry fitted together with a few bolts you can dry shift through the gears by clicking the shift fork counter clockwise (if you are looking at the shift star with the shift mechanism removed). Then shift back down to neutral by turning the drum the other way... it'll be difficult to turn it by hand, so you can use a big screw driver to help coax the drum.
_____Now you can use some alcohol or brake/parts cleaner to clean the mating surfaces of the upper and lower case halves and case covers where RTV gasket goes.
_____And double check to make sure the oil passages are clean
_____Put RTV down on the upside down engine case half in the designated areas (see pics)
_____Make sure the half ring washer on the output shaft is in the chanel, but also note worthy is just to the right there is another alignment pin to be sure is placed corectly... if not, the crank case halves won't close together and seal.
_____Make sure the two swing arm pivot collars are in the correct position
_____Make sure the 3 case halves dowels are present
_____Slowly put the case halves together while a second person guides the shift forks into the transmission (as described earlier here)
_____You can now start bolting the lower crank case half down...
_____The smallest of the bolts: 6mm (majority are in the front of the engine) get just 12Nm of torque (don't forget to use medium thread lock)
_____The 8mm bolts (majority are on the rear of the engine case) are 24Nm of torque
_____The ten 9mm stretch bolts get 20Nm of torque PLUS another 150 degrees rotation of the wrench (use new stretch bolts... there are three different sizes be aware)
_____The 10mm bolt on the right rear of the engine case gets 39Nm of torque.
_____Install the oil cooler... The oil cooler bolt is 74Nm of torque with the 30mm socket
_____The two 6mm water pump bolts are 10Nm of torque...
_____Make sure the water pump's drive shaft is locked in with drive shaft coming out of the back of the oil pump
_____Put the oil diffuser back on.
_____check the oil pick up screen for debri and re-install that if clean
_____Put the RTV down for oil pan if everything looks good
_____Bolt the oil pan back on... all the bolts are the same... 10Nm of torque
_____There is one alignment dowel on the stator cover side, so make sure that is in there.
_____Return the sprocket and dowel it spins on if you removed it.
_____Put the RTV gasket maker down on the Stator case cover edge (even under the wire lume collar).
_____When you put the stator cover back on be careful to not mess up the RTV because the magnetic force of the stator pulls it.
_____The bolts on the stator cover are also the 10Nm... basically common sense snuging them down works good too
_____On the clutch side, re-install the plate that goes around the output shaft, the three bolts get 12Nm of torque
_____Then you can slide the drive collar, chain, and oil pump sprocket on
_____You can torque down the oil pump sprocket to 15Nm by putting a screw driver through one of the holes
_____The next step is putting on the clutch but in order to slide it on the two sprockets on the crank have to be aligned (see how too pics)...
_____Make sure the holes in the clutch accept the nubs on the oil drive collar... otherwise it won't set all the way back and the oil and water pump won't turn.
_____Next you can put the large washer on the shaft.
_____Then you can put the clutch basket in
_____Then install the first washer
_____Then another washer that is slightly smaller, out side facing out.
_____Then a new clutch center nut... you can re-use yours too... don't forget to re-stake it into the grove of shaft after you torque it down to 127Nm of torque. It's a 30mm nut like the oil cooler bolt.
_____The Judder spring seat is what you insert first, followed by the Judder spring it's a concave shape (see pics for correct placement)
_____Then you put in the first fiber disk... it's called the "Large inner diameter disk"
_____Then it's just a matter of putting the steel plates and fiber plates in one by one alternating.
_____The last disk with the green edge goes into the clutch basket like this off set from the others
_____Next you can put in the clutch lifter and the bearing
_____Then you can put the lifter plate on
_____Then you can put your clutch springs in
_____The clutch bolts need medium strength thread lock... don't forget the washers that go along to.
12Nm of torque
_____Don't forget to re-bolt the cam chain tensioner guide bolt, 12Nm of torque.
_____Lay the RTV gasket down on the clutch cover, like the stator cover I put it under and over the wire coming out of the case.
_____When you put the cover on there are two alignment dowels to watch as you are putting the cover on...
_____clutch pull rod is insetered in the cover and turned open so it can properly hook on to the clutch lifter rod.
_____The clutch cover bolts are also 12Nm of torque and to use lock tight (like all the bolts)
_____At this point (if you haven't already) you can flip the engine upright again.
_____There are the crank case bolts you need to return. They are varrying different sizes, however it is not too difficult to locate their spots because they will either a) stick out to far or too little when dropped in OR b) they will be too big or small to thread into the bolt hole.
_____The big 10mm bolt is 39Nm of torque
_____The 8mm bolts are 24Nm of torque
_____and the one 6mm bolt is 12Nm of torque
_____Then you can wrap up by putting the hoses on the water pump etc
_____Done
Here's the how to rebuild a motorcycle transmission... you might also find my article on how to install a shift kit on your motorcycle a good time upgrade now.
HOW TO: CBR 929 Factory Pro Shift Kit Install w/ Clutch and Tranny Assessment
The Haynes/Clymer manual is an invaluable resource you should get before attempting to do any work on your bike because it has all the factory specs and measurements in case you want to micrometer every single part...
This tutorial is just picking up the flaws of the manuals. That is, they have a huge lack of step by step organization and clear direction.
Most motorcycle transmissions, especially inline four sport bikes, have sequential transmissions like this CBR 954 engine. Kawasaki 14r, 12r, 10r, 9r, 6r, 636, 250; Yamaha R1 and R6; hayabusa; ninja sv650 f4i fz6 fz1; Suzuki GSXR 1300, 1000, 750, and 600; and Honda CBR 1000rr, 954rr, 929rr, 900rr, 600rr even the interceptor VFRs, Rc51... you get the point

Here's a list you can print out, check off as you go:
Some supplies needed:______ziplock bags (20 or so small, 3 or so big)
______Sharpie permanent marker
______Card board box to collect bolts on... in a pattern by punching them through the top
______Zip ties
______Basic tools like 8,10,12,14, and 17mm wrenches and sockets, metric allen wrenches, screw drivers, etc
______Micrometer ($10 ebay version works)
______Torque wrench that can measure NM
______30mm socket (for oil cooler and clutch center nut)
______Snap ring removal tool
______Clutch center holder (you can make your own like I did, or buy one)
______Air impact wrench (helps greatly to remove clutch center nut)
______RTV gasket maker (high temp or regular black works)
______Molybdenum Disulfide grease
______Medium strength thread lock
______Parts or Brake cleaner in aerosol cans
______90% or so Alcohol
______The 10 new Crank shaft stretch bolts (several different sizes buy the kit on discounthondaparts.com)
______New oil filter
______New oil
Not required but worth the small extra cost:______new Clutch springs ($10)
______new clutch fiber disks ($50)
______Factor Pro shift kit ($75 for dedent arm and spring) ($170 for dedent arm, spring, and shift star)
Basic checklist in a good order to get an engine out of a bike (this is a CBR 929/954):______Remove the seats
______Remove the side fairings
______Remove the battery
______Drain the oil,
______Drain the coolant
______Siphon all the gas you can out of the tank
______Remove the fuel tank
______Remove the Air box
______Remove the throttle bodies (plug the holes with rags)
______Remove the radiator and it's hoses and reservoir
______Remove the exhaust (don't be afraid to heat it up the studs and use an air impact wrench... best way to avoid breaking studs off in the head)
______Remove the ignition system (leave Spark plugs in)
______Disconnect all the wire harnesses to the engine (starter wires, stator wires, kick stand switch, neutral indicator, speed sensor, etc, etc) they all only plug into the plug they came from so no need to worry about keeping track... just don't forget any.
______Unplug the Regulator Rectifier... follow wire up off left engine cover.
______Disconnect the control cables to the engine like the clutch cable.
______Mark a dot on the gear change shaft coming out the engine at the gap where the pinch bolt spans... then remove the shifter.
______Remove the Left rear set
______Hold the rear brake (bike in neutral)... sitting on the bike works... and remove the front sprocket.
______Remove rear master cylinder and switch (tie it to the swing arm)
______Remove the kickstand after supporting what's left of the bike... ignore the manual's suggestion to wonkily support the rear of the bike by the passenger pegs...
*zip tie front brake lever squeezed to right grip to lock the front tire
*Jack the rear of the bike up so the tire is off the ground a few inches (2 jacks lifting each side of a 2x6 through the rear wheel... use common sense to jack both evenly up... it's more stable than you think if you have good hydraulic floor jacks)
*Put blocks of scrap wood screwed together supporting the engine (and eventually the rear of the bike) Using the underside of the stator and under the clutch cover are good points to do this from... make sure the engine support is a solid piece screwed securely.
______Remove the intact swing arm with wheel, linkages, and rear brake assembly as one by removing the bottom of the shock from the triangle linkage plates, the pivot bolt for the linkage plates to the frame bracket, and the big pivot bolt... it does take a big 24mm allan key to turn the bolt... I made mine. (only CBR 929 and 954 have the swing arm attached to engine... so most bikes don't require this step)
______ Clean the engine now while it's still sealed up tight fairly well, use brake cleaner, a few different sized wire brushes and common sense.
______At this point you are ready to start unbolting the engine from the frame Assuming you didn't miss disconnecting anything.
______Loosen all 5 of the bolts hanging the engine from the frame Two on top and middle left and right side and one long one for the rear of the engine. (if your wooden stand can't cradle the engine well enough as the frame is unbolted then remove it and put a bunch of blankets on the ground under it.)
______Have a guy hold the sub frame and frame up while someone removes the bolts holding the engine in... once free, lift the frame and sub frame assembly high enough so the rest of the bike can be safely moved off the engine that is now laying the blankets leaking a little oil and coolant etc.
Splitting the cases:-Again, get a manual for the exact details on any given step for detailed instructions on torque and wear specs... this is just a nice point by point list for you to print out... that just happens to have a ton of color pics.
______(with the engine out the pulse generator (red plug) should be unplugged and the clutch cable bracket should be removed)
______Remove and bag the clutch cover bolts (they are all the same on the CBR)
______Turn the Clutch release lever on the cover until it releases and allows the cover to come off
______Remove Clutch cover (keep lever with it) and bag it in a separate bag from the dirty cover bolts
______Remove the five clutch bolts, and the keep the springs with them.
______Springs standard height: 48.8mm, get new ones if 47.4mm or less or if springs are warped
______After checking the clutch spring specs remove the pressure plate and all the hardware with it (bag it all together)
______Remove the clutch disks
______Fiber disk standard thickness: 2.9+mm, get new ones if 2.6mm (.1 in) or less
______Plain plate standard thickness: .3mm+ (.012in), get new ones if less or if warped
______bag them together in order the right order in a ziplock with them submerged in motor oil.
______Remove the clutch center nut after un-staking it.
______Keep track of all the washers
______Pull the clutch housing off the shaft... bag it (with the washers)
______Remove the oil pump sprocket nut by using a flat head through one of the holes to lock it while unbolting the nut.
______Slide both sprockets out with the chain and bag.
______Remove the plate holding the input shaft bearing and cases together (3 10mm bolts) and bag them
______Unbolt the lower cam chain guide bolt (so the cases can separate later)... return bolt to the hole so it doesn't get lost.
______ Leave the shift mechanism and drum in for now
______Remove Stator cover (You can bag all the bolts together because they are the same)
______You can remove the sprocket (and it's shaft) connecting the starter to the fly wheel (bag them)
______Remove the swing arm mount if you haven't already
______Remove the two hoses on the water pump (don't have to remove them off engine)
______Remove the 8 bolts holding the engine cases together from the top of the engine (put them into a card board box in their orientation, don't forget their washers)
______ Flip the engine over
______ Remove the oil filter and oil cooler(30mm socket) (stay organized by leaving the hoses attached)
______ Remove the oil pan (all the bolts are the same so it's up to you if you want to bag them or put them in a card board template)
______Lift off the oil pick up and oil diffuser (bag them together)
______Remove the water pump (set it aside, it'll be attached to oil cooler with hoses)
______Remove all the bolts holding the cases together, including the 10 stretch bolts... put them into a card board box to keep them organized as to where they went... even the stretch bolts that you're not going to re-use... but so you know where the new ones go)
______Separate the cases and set the lower case half off to the side
______Locate the 3 alignment dowel pins (it's up to you if you want to bag them or leave them in place)
______Locate the two steel swing arm pivot collars that are laying loose (bag them or leave them, it's up to you)
______If you haven't already, it's a good time to take some pictures of the transmission and cases for reference later to look at upon assembly
______Inspect the crank journals, seals, oil passage channels, shift forks, shift drum, etc.
______Clean off the old gasket from the engine and case covers
______Remove shift mechanism from lower engine case (that is now separated from engine)
______Remove shift drum if you need to replace it (two 10mm bolts and it pulls out)
______Remove shift arm and spring (bag them together with all the bolts)
______Remove shift forks by lifting shift shaft out if you need to replace your shift forks
______Inspect all the parts
______Lift the drive shafts out (input and out put shafts)
______Remove gasket off output shaft and the half ring washer
______Remove end cap off output shaft
______6th gear, the roller bearings inside it, and the washers on either side of it pull right off
______5th gear can pull right off the output shaft too
______Remove the first snap ring with your snap ring removal tool
______Lay each gear, washer, bearing, snap ring, etc, out in order as it comes off the shaft face up (see pics)
______4rth gear, the grooved washer, and the collar it rests on pulls off
______Remove the toothed washer and the washer it locks into (note how they are placed before you remove them)
______3rd gear can now be removed along with the collar it rests on and the washer after it
______Remove the second snap ring
______2nd gear can now come off the output shaft
______Remove the third snap ring
______Remove the grooved washer, 1st gear, and the collar it rest on off the output shaft.
______You can disassemble the input shaft in the same way (if needed)
______You can now closely inspect the gears, replace the ones needed, or salvage them in the way that is described in the how to here.
Reassembly:______With all the gears laid out in order, you can orient and swap out what gears you've bought or salvaged...spray the gears you worked on with parts cleaner to remove the shavings or dirt etc.
______Reassemble the gears, washers, snap rings, etc back onto their shaft in the same way that they were removed. If you kept good order of everything it's no problem.
______Compare your final rebuilded transmission to the picture you took before you removed the shafts out of the case
______Place the shafts back into the case half, make sure the hole in the caps fit into the pins in the case.
______Put the Molybedium disulfide grease on the crank journals and bearings.
______If you haven't already, put the shift drum, forks, and dedent arm with spring in.
______The shift forks go in like so with the "R" fork nearest the clutch/ right side of the engine, "C" is in the center, and "L" is on the stator/left side of the engine.
______If you took the shift star off the shift drum you can put it back on... 15Nm of torque
______The drum/shift fork shaft retainer bolts also need medium strength thread lock (as do all the bolts you're re-installing) and can be torqued down to 12 Nm...
______The shift arm can be torqued down to 12Nm
______The shift mechanism slides right in and positions over the shift star to select gears.
______You can put the lower case half on dry, put a bolt in each corner and try shifting through the gears to make sure you installed everything right.
______As you lower the case half down you have to align the shift forks into the transmission. the shift fork pins only fit into the drum one way... as for the shift forks: the R and L fit back into the output shaft and the Center fork fits forward into the input shaft.
______With the cases temporarily dry fitted together with a few bolts you can dry shift through the gears by clicking the shift fork counter clockwise (if you are looking at the shift star with the shift mechanism removed). Then shift back down to neutral by turning the drum the other way... it'll be difficult to turn it by hand, so you can use a big screw driver to help coax the drum.
_____Now you can use some alcohol or brake/parts cleaner to clean the mating surfaces of the upper and lower case halves and case covers where RTV gasket goes.
_____And double check to make sure the oil passages are clean
_____Put RTV down on the upside down engine case half in the designated areas (see pics)
_____Make sure the half ring washer on the output shaft is in the chanel, but also note worthy is just to the right there is another alignment pin to be sure is placed corectly... if not, the crank case halves won't close together and seal.
_____Make sure the two swing arm pivot collars are in the correct position
_____Make sure the 3 case halves dowels are present
_____Slowly put the case halves together while a second person guides the shift forks into the transmission (as described earlier here)
_____You can now start bolting the lower crank case half down...
_____The smallest of the bolts: 6mm (majority are in the front of the engine) get just 12Nm of torque (don't forget to use medium thread lock)
_____The 8mm bolts (majority are on the rear of the engine case) are 24Nm of torque
_____The ten 9mm stretch bolts get 20Nm of torque PLUS another 150 degrees rotation of the wrench (use new stretch bolts... there are three different sizes be aware)
_____The 10mm bolt on the right rear of the engine case gets 39Nm of torque.
_____Install the oil cooler... The oil cooler bolt is 74Nm of torque with the 30mm socket
_____The two 6mm water pump bolts are 10Nm of torque...
_____Make sure the water pump's drive shaft is locked in with drive shaft coming out of the back of the oil pump
_____Put the oil diffuser back on.
_____check the oil pick up screen for debri and re-install that if clean
_____Put the RTV down for oil pan if everything looks good
_____Bolt the oil pan back on... all the bolts are the same... 10Nm of torque
_____There is one alignment dowel on the stator cover side, so make sure that is in there.
_____Return the sprocket and dowel it spins on if you removed it.
_____Put the RTV gasket maker down on the Stator case cover edge (even under the wire lume collar).
_____When you put the stator cover back on be careful to not mess up the RTV because the magnetic force of the stator pulls it.
_____The bolts on the stator cover are also the 10Nm... basically common sense snuging them down works good too
_____On the clutch side, re-install the plate that goes around the output shaft, the three bolts get 12Nm of torque
_____Then you can slide the drive collar, chain, and oil pump sprocket on
_____You can torque down the oil pump sprocket to 15Nm by putting a screw driver through one of the holes
_____The next step is putting on the clutch but in order to slide it on the two sprockets on the crank have to be aligned (see how too pics)...
_____Make sure the holes in the clutch accept the nubs on the oil drive collar... otherwise it won't set all the way back and the oil and water pump won't turn.
_____Next you can put the large washer on the shaft.
_____Then you can put the clutch basket in
_____Then install the first washer
_____Then another washer that is slightly smaller, out side facing out.
_____Then a new clutch center nut... you can re-use yours too... don't forget to re-stake it into the grove of shaft after you torque it down to 127Nm of torque. It's a 30mm nut like the oil cooler bolt.
_____The Judder spring seat is what you insert first, followed by the Judder spring it's a concave shape (see pics for correct placement)
_____Then you put in the first fiber disk... it's called the "Large inner diameter disk"
_____Then it's just a matter of putting the steel plates and fiber plates in one by one alternating.
_____The last disk with the green edge goes into the clutch basket like this off set from the others
_____Next you can put in the clutch lifter and the bearing
_____Then you can put the lifter plate on
_____Then you can put your clutch springs in
_____The clutch bolts need medium strength thread lock... don't forget the washers that go along to.
12Nm of torque
_____Don't forget to re-bolt the cam chain tensioner guide bolt, 12Nm of torque.
_____Lay the RTV gasket down on the clutch cover, like the stator cover I put it under and over the wire coming out of the case.
_____When you put the cover on there are two alignment dowels to watch as you are putting the cover on...
_____clutch pull rod is insetered in the cover and turned open so it can properly hook on to the clutch lifter rod.
_____The clutch cover bolts are also 12Nm of torque and to use lock tight (like all the bolts)
_____At this point (if you haven't already) you can flip the engine upright again.
_____There are the crank case bolts you need to return. They are varrying different sizes, however it is not too difficult to locate their spots because they will either a) stick out to far or too little when dropped in OR b) they will be too big or small to thread into the bolt hole.
_____The big 10mm bolt is 39Nm of torque
_____The 8mm bolts are 24Nm of torque
_____and the one 6mm bolt is 12Nm of torque
_____Then you can wrap up by putting the hoses on the water pump etc
_____Done
__________________
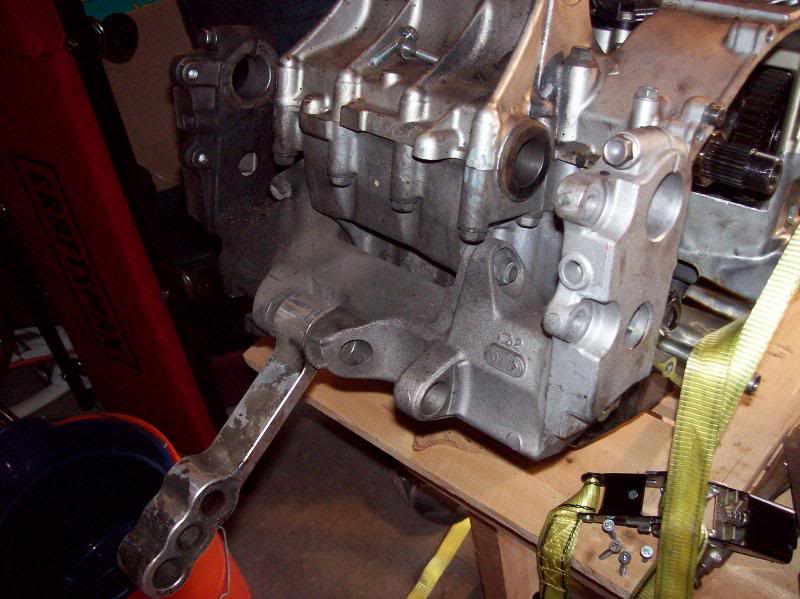
So here's the step by step with pictures.****click on them to make them larger****** Most modern I-4 sport bikes are assembled like this CBR 954 where you have to split the cases to get to the transmission. Exceptions like the Kawasaki 636 are nice exceptions because their transmissions can slide out the side with the engine still in the bike.


Remove the clutch lifter rod and bearing


And hitting the notched out area... it didn't work...

Bracing the hub with screw drivers and strapping the engine down to the table and using heat didn't work.


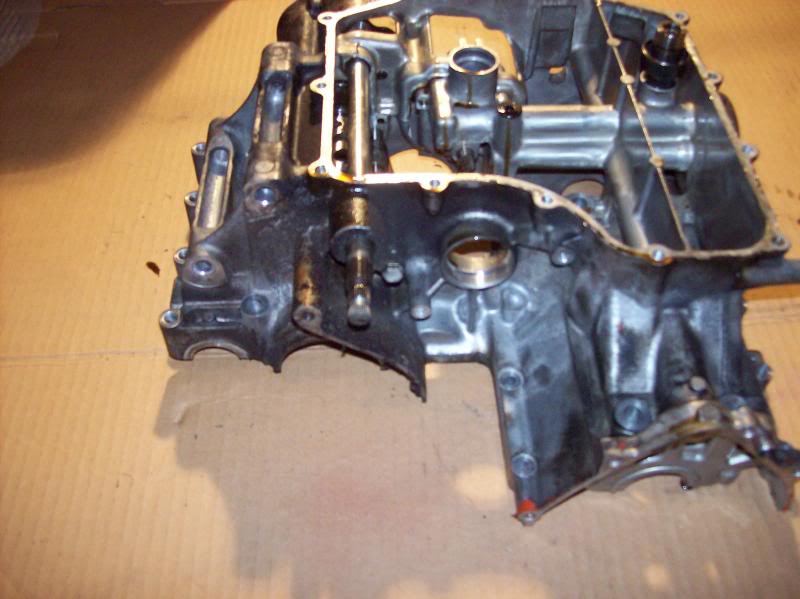
You can leave all the shifting mechanisms, drum, shift rods, etc in (on the left)


That's it for the Stator side, no need to remove anything else here


Again, I keep track of the order and placement of bolts by putting them in the same relative pattern/location that they would be on the engine stuck in a piece of cardboard.


Remove the oil pick up strainer and also the oil difuser. Bag them together.


The dozens of bolts holding the cases together are different sizes and they can be re-located if they get mixed up... that is except for the 10 stretch bolts that have just a few mm of difference between them lengthwise. You must buy new stretch bolts, but having the correct placement known ahead of time is nice.

Don't forget about this bolt holding the lower cam chain guide before you attempt to seperate the cases


Here's the clutch side of the lower half right side up... all the shift mechanisms, drum, forks, etc are still in place in this piece.


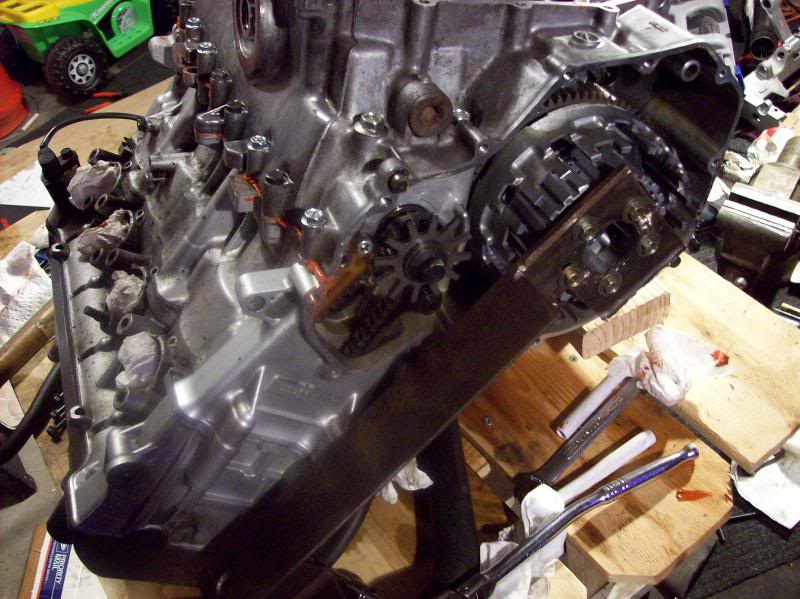
As I waited for parts I put the cases on with just a few bolts for each one and really cleaned the engine up.


See:
HOW TO: CBR 929 Factory Pro Shift Kit Install w/ Clutch and Tranny Assessment


3rd gear can now slide off

Third gear also has a collar that it rests on

Then another washer comes off

Then you have to remove another snap ring with your tool.

Then 2nd gear can come off the output drive shaft in the 954/929 transmission.

Then another snap ring... you will notice that snap rings are on either side of the gear sprockets that move side to side on the drive shafts via the shift forks that engage the gears.
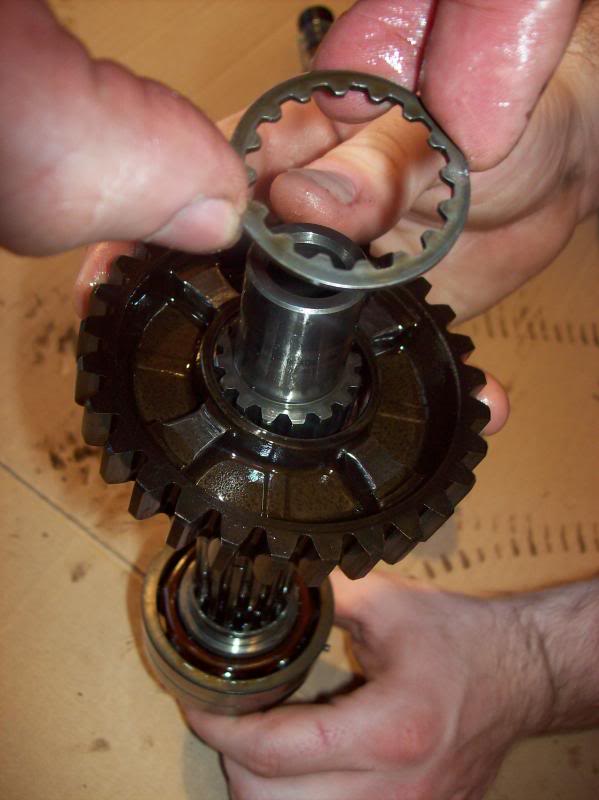


1st gear has a collar that it rests on too.


Here's a new CBR 954 first gear compared to the used 1st gear. You can save 30% by buying from discounthondaparts.com... rarely will you find a good used first gear for sale on sites like ebay... actually, rarely will you find individual gears for sale on those sites.

Here's 954 6th gear compared the the sixth gear on 929 transmission that was purchased on ebay they are interchangable

However the rest of the gears on the output shaft are not interchangable 954 to 929. Thats because (for whatever reason) the 954 gears have four dogs and the 929 has five dogs.


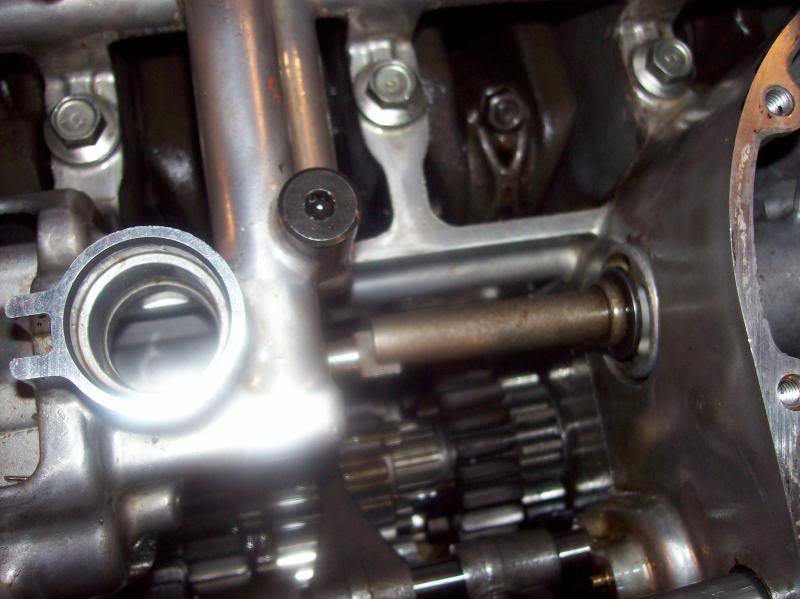
This input drive shaft has the clutch attached to it and the clutch transmits cranking power from the crank shaft to the input shaft which in turn transmits power to the output shaft through the specified gear ratios in the transmission which makes your rear tire move. Most motorcycle transmissions, especially inline four (I-4) sport bikes, have sequential transmissions like this. Kawasaki 14r, 12r, 10r, 9r, 6r, 636; Yamaha R1 and R6; Suzuki GSXR 1300, 1000, 750, and 600; and Honda CBR 1000rr, 954rr, 929rr, 900rr, 600rr even the interceptor VFRs, Rc51... you get the point


With all this work you are simply recreating the flat crisp edge for the engaged gear's dogs to rest on as the cranking power is transmitted throught the mated gears. The rounding happens if the rider mis-shifts hard and often enough that it damages the gear. It can be from poor timing of the shifts, not shifting hard enough, worn or bent shift forks, or other bad shifting habits.
__________________


Also note the three alignment studs in the case halves before re-joining the cases. And here are the places to put the molybdenium disulfide grease too.

The shift forks go in like so with the "R" fork nearest the clutch/ right side of the engine, "C" is in the center, and "L" is on the stator/left side of the engine.


Bikes shift best if the engine is running and the bike is moving so don't be discouraged if it's not shifting fast and crisp up and down.


the manuals aren't very clear on the torque specs... they don't mention that the front crank case bolts are only 6mm in the front of the chapter for the torque specs, leading you to believe these small bolts are 8mm which say to use 24Nm of torque... which equates to 18ft lbs of torque... that is over double what you are actually supposed to use and all the 6mm bolts broke with that ammount of torque.
So after a trip to Menards (who actually had the identical bolts in stock) and looking over the manual for what went wrong we found in the very front of the honda manual it says to use only 10Nm of torque on 6mm bolts.... we also used medium strength thread lock (which we used on all the bolts). It would have been nice if both Haynes and Honda would have clarified this in the beginning of their chapters instead of assuming you know all this.
So after a trip to Menards (who actually had the identical bolts in stock) and looking over the manual for what went wrong we found in the very front of the honda manual it says to use only 10Nm of torque on 6mm bolts.... we also used medium strength thread lock (which we used on all the bolts). It would have been nice if both Haynes and Honda would have clarified this in the beginning of their chapters instead of assuming you know all this.


It's confusing because the different manuals out there differ in what torque specs to put down. The honda pdf manual I saw says 35Nm of torque and the Haynes Manual says 20Nm of torque plus 150 degree rotation...


All the oil pan bolts are the same so you can put them in and torque them down to 10Nm.


The bolts here are also the 10Nm... basically common sense snuging them down works good too


The sprockets should be flush.


Then it's just a matter of putting the steel plates and fiber plates in one by one alternating.


Once the cover is on and you feel the need to test out the clutch... don't be surprised if you can't turn the clutch pull rod by hand... If you use a pipe about a foot long or so then you can easily enough test it out.


The big 10mm bolt is 39Nm of torque
The 8mm bolts are 24Nm of torque
and the one 6mm bolt is 12Nm of torque


Hope the write up helps.
It's been running great all summer 2015 since we did the job last year.
-Matt Behning
No comments:
Post a Comment