Matt Behning here.
Up to now I've made one and two piece carbon fiber parts. You can check out these posts to read on the techniques I use in making a high quality carbon fiber part (materials in the product) without having to use expensive materials that aren't in the final part. See:
HOW TO: Vacuum formed Carbon Fiber Part for $200 (Part 1)
HOW TO: Make a Carbon Fiber Part (Part 2: making a clay mold)
HOW TO: Make a Carbon Fiber Part (Part 3: making a fiberglass mold)
HOW TO: Make a Carbon Fiber Part (Part 4: making the budget vacuum bag)
HOW TO: Make a Carbon Fiber Part (Part 5: mold prep and cutting CF)
HOW TO: Make a Carbon Fiber Part (Part 2: making a clay mold)
HOW TO: Make a Carbon Fiber Part (Part 3: making a fiberglass mold)
HOW TO: Make a Carbon Fiber Part (Part 4: making the budget vacuum bag)
HOW TO: Make a Carbon Fiber Part (Part 5: mold prep and cutting CF)
This post is about how to make a four piece carbon fiber part. It happens to be a gun stock for a shot gun that broke. But it relates to any more complex piece you'd like to make like a carbon fiber motorcycle tail, a carbon fiber case, side fairings, head light enclosure, etc.
 |
| How to make carbon fiber stock. by Matt Behning |
 |
| how to make carbon fiber gun. |
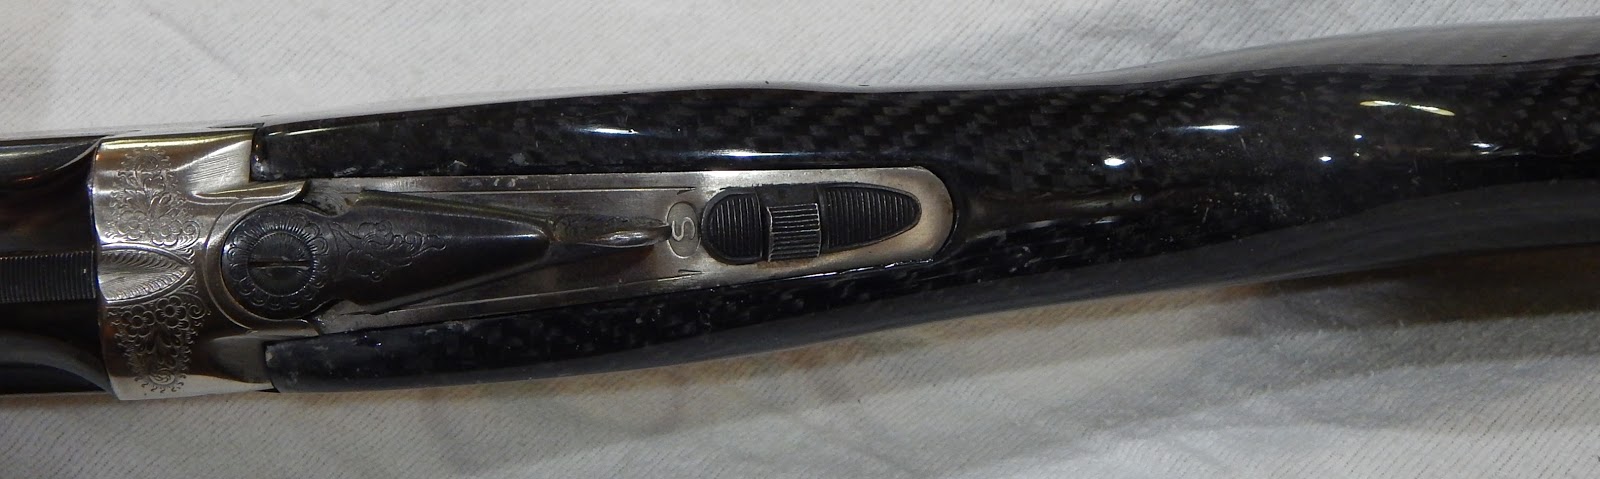
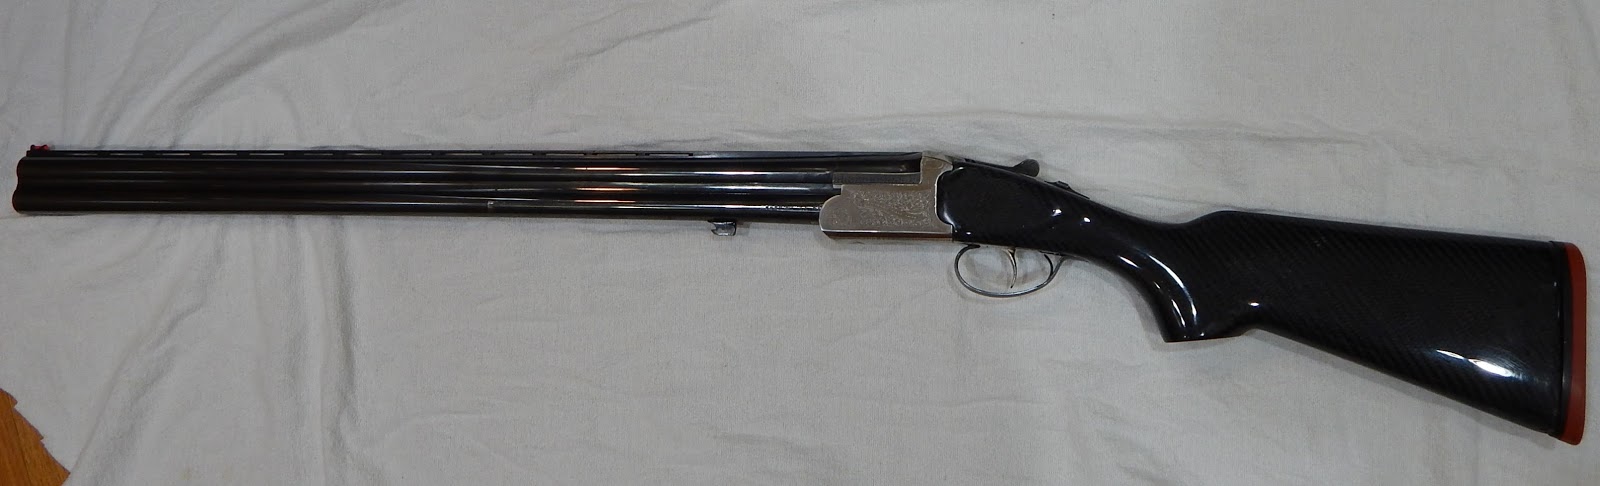
This is common on firearms with wood stocks like this to break here as it's the weakest point. Buying a new wood stock is an option, but it'll possibly happen again. Especially if you go to the range and hunt as often as I do. Transporting with a hard case and being careful is obviously a good preventative measure. The best option for me was to replace it with a home made carbon stock since there are no aftermarket stocks for this model of shot gun. It's a Charles Daly Deluxe over / under 12 gauge shotgun, manufactured by Zabala Hnos, Spain.


Time:
The whole project took 55 hours, but 12 of it was wasted on trying to make a mold out of bondo and also my first part didn't vacuum bag perfectly to the mold as I'd had liked so I had to remake it. So might expect to spend 43 hours to make a part like this.
Cost:
Cost:
I used one yard of Carbon Fiber 2x2 twill that cost me $22/yard (it comes in rolls 50 inches wide)
about 30 ounces of max clear 1618 epoxy resin that cost me 60 cents an ounce = $18
I used 6 tubes of caulk at $2.50 each = $15,
can of spray foam $5 (free to me since a friend gave it to me)
Big jar of corn starch $6
Two cans of acrylic lacquer clear spray paint = $12
Other costs for things like plastic sheeting I use for the vacuum bag, carnuba car wax, duct tape, sand paper, wax paper, clear tubing, wood for the molds, and other small things from things I have in my garage probably cost another $20.
Other costs for things like plastic sheeting I use for the vacuum bag, carnuba car wax, duct tape, sand paper, wax paper, clear tubing, wood for the molds, and other small things from things I have in my garage probably cost another $20.
I spent $71 on supplies not counting the cost for materials I used in the failures with the bondo and first set that didn't adhere well to the mold.
The four hours was to cut and try make a cardboard wall for the bondo to pour into... Obviously this is worth abandoning in hindsight because it's labor intensive. But I wanted to test the limits of bondo that cures faster than plaster... it didn't work because there was voids and cavities under the part once I popped it out. I prevented the wood from the original stock from getting more damaged by putting several layers of carnuba car wax on and letting it dry.
Know that everything I write on here is just how I do things and is not always the best way as you see. So don't blame me if you're results are different or you ruin something.


Here bondo works great to make a copy of the inside of this part of the gun stock (or any small part you want a very detailed and strong copy of). The limitation is it doesn't like to come out because it cures so hard so be sure to use several layers of carnuba wax letting dry fully between layers.

So usually when I make a mold I copy the parts with fiberglass and resin see:
This time I wanted to try this stuff called "Oogoo" all it is is mixing cheap 100% silicone caulk with cornstarch... it's very affordable compared to "mold making kits" that come with very little. It's hard to explain how to mix it in the right ratio, but there are good youtube videos on it that I learned quickly from. Becareful to not use too little cornstarch cause your part will stick to it in addition to the mold not curing below the surface. I coated the part to copy with cooking spray just to be safe.

After one side was done I left the part in the mold so the opposing mold would make and equal part. Again spraying a film of cooking spray so the "oogoo" wouldn't permanently seal in the part.


 |
| oogoo mold |
To copy the cavity inside of the stock is making a mold for the 4th part of the carbon fiber part. The long threaded bolt is inserted down the stock through the bolt hole that leads to the gun to bolt the two together. The other purpose of the bolt besides marking where to drill the hole is that provides a good part for the "oogoo" mix to secure to and gives something to pull on to get the cured mix out. By this point I perfected my "oogoo" mixing technique well enough to trust pushing it down the hole while it was pliable without fear it would stick to the sides. If done correctly the mix has the consistency and stickiness of play dough. it only has about 5 to 8 minutes of working time and take a good 30 to 45 minutes to cure.

tacked on wood to the back of the molds to make them stronger and insure the mold wouldn't flop out.

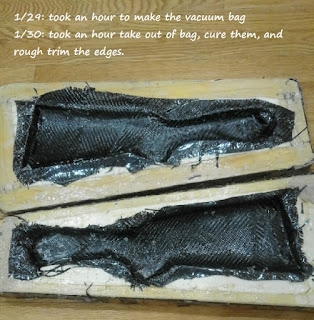
Here you can see all four pieces. Two halves are 8 layers thick, the inside of the stock to form the cavity that needs to be the right length is 4 layers. If it's not the right length the bolt will be too long or short to secure the stock to the gun, and lastly the piece to conform to the gun where the stock and gun meet are just two layers. This is after I vacuum bag made the parts as described in previous threads (see top of this post)


here you can see the unacceptable (to me) flaw with the carbon fiber where it failed to seat perfectly to the mold. This happens either with too deep of a negative mold (positive molds are best i think), not enough vacuum, or in this case a lack of a "helper piece" to help the carbon fiber conform to the mold.


Second try came out much better:

Here's mating the part made from the bondo copy from inside the wood stock. To make sure the part would be strong I cut up carbon fiber and used it as a filler in this susceptible area to stock. I eventually cut this U shaped part in half as you can later see. The other half is taking a coat of epoxy resin because you can't use body filler unless you plan to cover the part with paint.


Here's mating the part made from the bondo copy from inside the wood stock. To make sure the part would be strong I cut up carbon fiber and used it as a filler in this susceptible area to stock. I eventually cut this U shaped part in half as you can later see. The other half is taking a coat of epoxy resin because you can't use body filler unless you plan to cover the part with paint.

I covered the firing mechanism of the gun with painter's tape to protect it. and set the half in the gun for the epoxy to cure to make the accurate part and fitment. You can not just lay up chopped strand and wet it out and do this without the pre-made copy of the inside of the wood because there are channels so stock can slide into place. If you did it differently the part couldn't slide into place later.

Fitting the other inner plate the same way

rough look at how it's coming together... still needing to put fourth part in. Added a second epoxy coat after sanding.

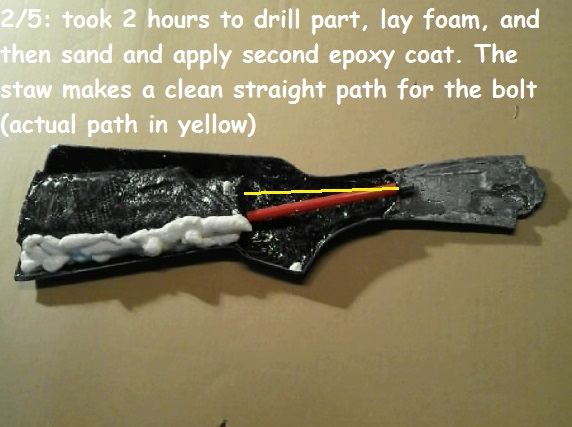
Here's after the inner cavity is set in and after it was cured in with epoxy and some layers of carbon fiber underneath to get the right height. I used a straw to make a straight channel to the space it needed to go... the actual path is in yellow. If you didn't have the straw in place than you'd have to get a really long drill bit and somehow accurately get it drilled through to the right spot. I used spray foam and later cut it and sanded it down while intermittently checking fitment of the other half... too little space than the halves don't come together... too much space and you'll have air pockets or weakly bonded together areas of the stock... something okay with perhaps a cosmetic part... but not a double barrel 12 gauge shot gun. What isn't pictured is the layers of carbon fiber laid before resting the two halves together to cure. foam was carved back into the lower halve to allow carbon fiber to bond between the gap.


It took many coatings and subsequent sanding of epoxy resin to work out the flaws and perfect the fitment to the mating surfaces with the gun. 95%+ of the epoxy you put on gets sanded off... it's for voids bigger and deeper than what filling with clear coat and sanding could work out. I sand with 120 to work out flaws of built of epoxy.


To get a great shine you need to put on a similar layers of clear and then sand and repeat. I sand with 220 to work it out and then 400 and wiping down with alcohol or your choice of surface cleaner before more clear coats. I use about a half a can or about 8 layers with ten to twelve minutes between each coat. I wait at least 24 hours before trying to sand either cured epoxy or clear otherwise it can be a little gummy.


Next is hand sanding with 220, 400, and then starting wet sanding with 600 and then up to 1,000 and even 2,000 grit paper. (yes spealt polish wrong)


Polish with heavy, medium, and light car wax next.


Then it's done!