I'm Matt Behning
Here's how I retrofit HIDs, Angel eyes, Demon eyes, or all three (like me) for any bike, car, boat, whatever really.
I did it right, fuses, ample gauge wiring, 30 amp switches, connectors, baxter relays, Metal projectors with glass crystal lens, and best of all... FOR UNDER $200! so follow the pictures... and take from it what you want. There are smaller projectors (same brand) for new CBRs to retrofit them in just like me. Feel free to ask questions, give comments, and point out suggestions here.
This is NOT a kit and it's made from parts easily bought on Ebay and Radio Shack for under $200... All details are in the pics...
Good Luck!
-Matt Behning (Stillwater, MN)
Remove the bolts from the gas tank first
Take the air intake covers off.
Take this triangle piece out so there's more room to put the wiring in.
Here's the screw to remove the triangle
The radiator side of your motorcycle is not a good place for wiring.
Remove your display.
Here's the back of the 929 display
It's a good idea to put what bolts you can back after removing the part you're after.
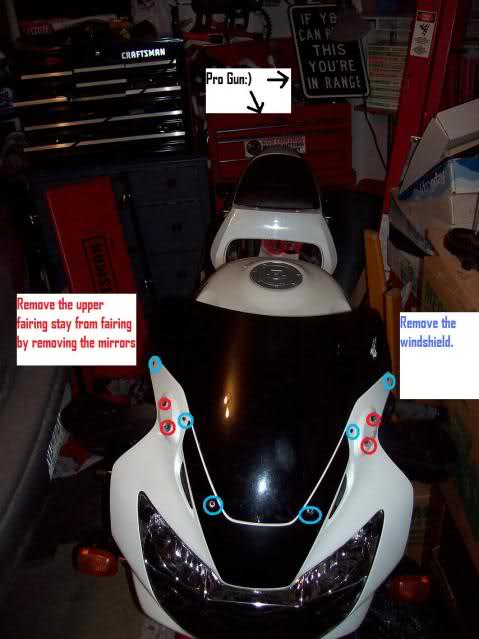
Separate the top part of the fairing stay from the bottom part.
Remove the mirrors and remove the winshield
Slide the upper part of the fairing stay off the lower one.
Unbolt the lower fairing stay from the frame.
Mine was broke so I welded the fairing stay.
Remove the four bolts that hold the headlight housing in.
Lift the headlight out
Lots of room for the HID ballasts here
The other side has the radiator blow off.
Take off the rubber dust caps
After you remove your halogen light bulbs you can either put the headlight housing in your oven at 170 for about 15 minutes or use a heat gun to make the seal holding the headlight halves together loose enough to pull apart
There's tabs to lift up as you pull the halves apart.
The Xentec kits out there are E4 and ISO-9001:2000 approved. the ballasts are also shock proof and 100% waterproof. I bought mine from "OrangeMika" on ebay... he's a great ebayer because one of my ballasts kept over-heating and he mailed me a new one free of charge no questions asked.
I decided on 5000k color (white) and H3 bulbs (because that is what the projects I bought required. this way my bulbs were plug and play with the projectors I bought separately.
This kit cost just $49.00 shipped.
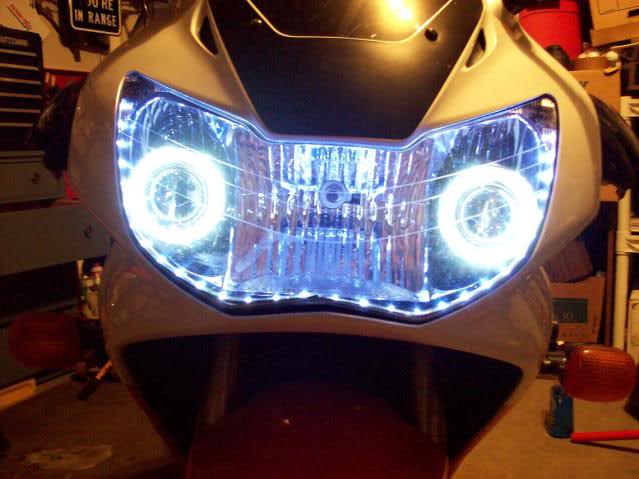
Buy projectors or else you will be blinding people and getting pulled over... I got these projector housings because they have a metal body with a glass lens. There is an Angel Eye ring with 7,000K CCFL.
Here's my wiring diagram.
The top
bottom
General lay out of the project.
After you make your wire harness for your project you can find the existing stock plug for the high beam bulb on whatever you are working on and it goes to the trigger post on your relay. If it's a baxter relay it's numbered as 85. They are about $3 at radio shack and you should get two.
Relay switches can allow it so your lights can only be turned on with bike on or if the high beam is on. It's a good idea because you can have your HIDs off when you're starting your engine. The power fluctuations that occur with the starter drawing from the batter at the same time would cause premature failure of the HID bulbs to burn out.
I like 3M electrical tape. it stays the test of time and Minnesota weather.
Here's the wiring harness going in on my Honda CBR 929rr.
Starting to get the wires run down the left side of the bike. I also have a 30 amp main power switch.
Make sure to test your work before wrapping it up. Label each wire at the battery side and the end of each wire.
Here's the view under the seat of the wiring. HID relay, Angel and Demon eye relay. Fuses. and main power switch.
Used the ribbed wiring protective tubing you can buy at any hardware store and used electrical tape to seal it.
I used a two inch hole saw to cut the holes for the projector housings in my stock headlight reflector
I put blue painters tape on the area cutting through so the reflective paint didn't chip off.
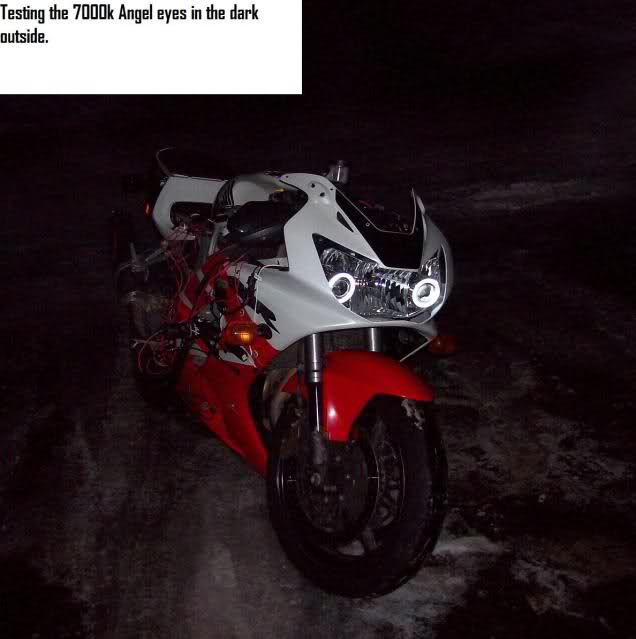
7000K rings have a bit of a blue tint
Testing the Lights outside in the dark
Above and below show why it's a good idea to buy projector housings if installing HIDs in your project.
I used play dough or clay to align where to drill to mount the lights.
Remove the reflectors from the housing with the two screws and the bolt because you have to drill and screw the projectors in... the projectors have the tapped holes on the sides with the mounting hardware.
I use medium lock tight on the threads.
3M double sided tape and black RTV gasket also useful.
Placed the 12 inch long LED strips in the headlight housing for the demon eye look.
used the heat gun to close it all up again.
The stock dust caps fit nice
Have the stock central halogen low beam for back up
What the low beam on actually looks like
Just the low beam on
Put the HIDs on and there's your reason to do this mod considering the night and day difference between halogen bulbs and HIDs
 |
| Custom CBR 929 with HID, Angel and Demon eye |
 |
| CBR with HIDs |
I started on 12-29-09 when I ordered the $49 dollars for the HIDs and ballasts and paid $116 for the projectors with angel eyes, the two 12 inch white LEDs and 4 12 inch Red LEDs, plus wiring = Less than $200
Clearly it's not a kit, so it's not plug and play... so I started tear down on 12-29-09 a couple hours a day for two days (on days off so 4 hours) and when everything was pulled apart it took another maybe 6 hours total to make a new wire harness, cut the reflector exactly right for the projectors, get the wires in for testing the lights and the wire harness, completing final fittment and ailignment of the projectors, incasing the wiring in weather plastic tubing and tucking them in, and finally getting the headlight assembly together along with all the plastics and the bolts etc....
Those are the major steps taking a total of 10 hours total for a complete perfectionist like myself... I have experience wiring sound systems in cars... so that helped cut down time on the wire harness... but if someone experienced did it... probably 8 hours. Plus I hope this "how to" can
help people cut the time and effort down to 8 or 9 hours for someone who is a beginer.
Remember if your ride has a motor and a battery you can do this mod... I know 929s have huge reflectors/headlight assemblies... but there are some good looking smaller projectors for those with say a newer cbr 600rr. I highly support the mod not just for looks but the safety of being seen better is important.
It's been almost six years since doing this Mod and the set up has worked great ever since.
Thanks for reading.
-Matt Behning
Stillwater, MN
This is the H3 bulb size projectors I bought
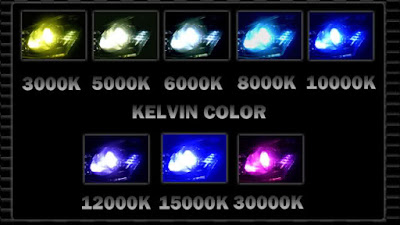 |
| A chart of the different color spectrum with the different HID colors. 3000K, 5000K, 6000K, 8,000K, 10000K, 12000K 150000K and 30000K |
 |
| Another reference for light spectrum per degree kelvin when choosing HIDs |


No comments:
Post a Comment